
How To Choose Your Deadlift Stance

When I ventured back into barbell deadlifting three years ago I immediately defaulted to a conventional stance for my deadlift. I feel most powerful and strong when deadlifting from this stance. I did play around with sumo stance for comparison, but concluded that sumo stance was not optimal for me.
How do you choose your deadlift stance? This is a very good question and often times lifters need guidance as to how to determine their optimal deadlift stance.
I thought the best person to provide this guidance would be my insanely strong, master of the bench press, and amazingly badass powerlifting coach Tony Bonvechio.

Me with some of the Cressey Sports Performance Women’s Powerlifting Group, from left Celie, Hilary, myself, and our amazing Coach Tony Bonvechio.
Read more from Tony in his guest post below, How to Choose Your Deadlift Stance…
*****
How to Choose Your Deadlift Stance
By Tony Bonvechio
Choosing a deadlift stance is like buying a car. You have one in mind, but you want to test drive a few others. You need to make sure it looks right and feels right when you’re behind the wheel.
Whether you end up pulling with a conventional or sumo stance, you don’t want to be left with buyer’s remorse. Many of the lifters I’ve coached are tempted to flip flop from one technique to the other, always asking themselves, “But what if…?”
This self-doubt can hurt a lifter’s progress and reduce their faith in the training process. Let’s break down how to choose the right deadlift stance so you can attack your training with confidence.
Conventional vs. Sumo – What’s the Difference?
The basic difference between the conventional and sumo deadlift is how wide you put your feet. This leads to a handful of other differences such as torso angle and hip position, but stance width is the main variable.
A conventional deadlift typically uses a hip-width or narrower stance, while sumo utilizes a wider stance with the feet well outside the hips. There are other subtle differences, and lifters will have small deviations in setup and technique.
Here’s a rundown of each stance.
Conventional (front view)
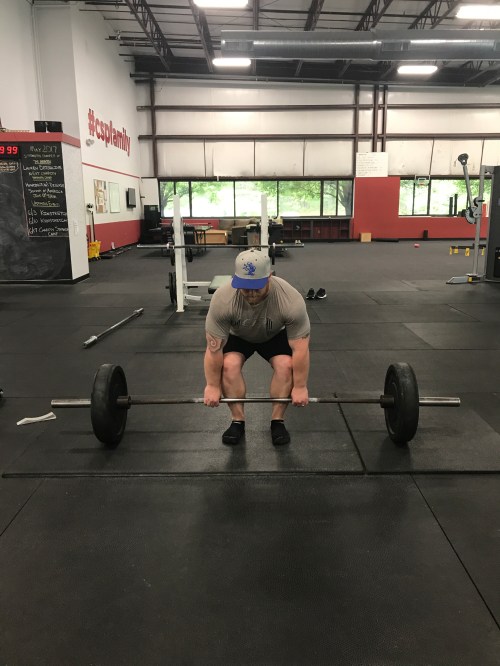
- Feet under hips about 2 inches from the bar
- Toes pointed straight ahead or slightly out
- Hands just outside hips, ideally straight down from shoulders
- Hips hinged and torso angled at about 45 degrees
- Shins angled slightly and knees pushed slightly over the bar
Conventional (side view)
Sumo (front view)
- Feet well outside hips
- Toes angled out so shins are flush against the bar
- Hands inside hips, ideally straight down from shoulders
- Hips closer to the bar and torso more upright
- Shins completely vertical
Sumo (side view)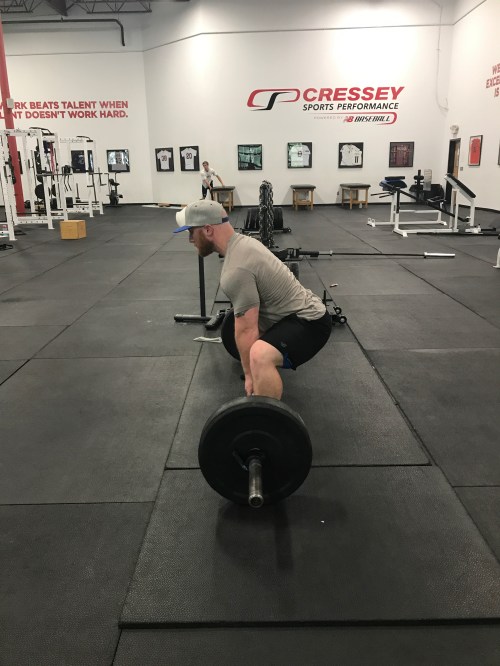
Pros and Cons
Each stance has its unique advantages and disadvantages. As a lifter, you’ll want to consider each of these based on your strengths and weaknesses. You may find that one deadlift style may cater to your specific strengths, making it a good fit for you, or that one style simply doesn’t jive with your current mobility levels, making it a poor fit.
Here’s a quick rundown of the pros and cons of each deadlift style.
Conventional
Pros:
- Potential to lift more weight: the majority of the 900-plus pound deadlifts performed in powerlifting history have been with a conventional stance, and all deadlifts over 1,000 pounds in competition have been conventional.
- Requires less hip mobility: you need less external rotation and abduction at your hips and groin to get into the right position compared to sumo.
- Better speed off the floor: it’s easier to get the bar moving quickly off the floor with a conventional stance. Think about where you’d stand to do a vertical jump; conventional is pretty similar.
- Easier to do multiple reps: conventional puts you in a better position to do multiple reps per set with good form, making it easier to get stronger overall.
Cons:
- More stress on the lower back: because of the bent-over position, you’re more likely to round your lower back during conventional deadlifts.
- Greater range of motion: the narrow stance requires the bar to travel a further distance from the floor to lockout.
- Harder lockout: similar to the previous point, the longer range of motion and potential for back-rounding makes it harder to lock out a conventional deadlift.
- Hips start further from the bar: because your hips have to travel backward away from the bar, the conventional deadlift technically requires more work from your hip muscles.
Sumo
Pros:
- Shorter range of motion: the main advantage of the sumo deadlift is a shorter range of motion, resulting in less work for your hip muscles.
- Less stress on the lower back: a more upright torso position means less potential for rounding your lower back.
- Hips start closer to the bar: you don’t have to push your hips back as much, so your hips stay close to the bar for an easier lockout.
- Better for quad development: sumo deadlifts require much more quad involvement, so if you want to build some tree trunk legs, pull sumo!
Cons:
- Lower maximum weight potential: historically, very few of the world’s top deadlifters use a sumo stance.
- Requires excellent hip mobility: you need pristine mobility in your hips and groin to get into position. If you’re super stiff, sumo won’t be a good fit.
- Slower off the floor: the wide stance makes it harder to explode off the floor. What you gain in reduced range of motion, you sacrifice in bar speed.
- Harder to do multiple reps: sumo caters to a one-and-done approach. It’s really hard to put the bar back on the floor in the same position as your first rep, making it harder to do high-rep sets with good form.
The Myth of Body Types
Based on the aforementioned pros and cons, you’ll hear people say that someone with such-and-such a body type should deadlift with a certain stance. Unfortunately, there’s no hard and fast rule for the right deadlift stance.
Ultimately, if you have long arms and short legs, you’re well suited to deadlift no matter what. If you have short arms and long legs, feel free to curse your parents for your lifelong struggle with heavy deadlifts. You can analyze limb lengths all day long, but when it comes to deadlifts, long arms always win.
What’s more important than body type? Mobility. If you can safely get into position for one stance more effectively than the other, go with that stance. If your lower back hates conventional, pull sumo. If your hips feel like they’re getting stabbed with knives during sumo, pull conventional. Can’t reach the bar on the floor with either stance? Elevate the bar using blocks or pins.
Don’t Knock It ‘Til You Try It
The best thing a lifter can do is try both stances for a considerable period of time. Eight to 10 weeks should be enough time to conclude if a stance works for you or not. Usually, one stance will be considerably stronger than the other, making that your go-to approach.
However, don’t be shy to train both stances. You can alternate blocks of training (i.e. do conventional for eight weeks, then sumo for eight weeks) or use them simultaneously (i.e. do conventional one workout and then sumo the next). There are distinct advantages to each one, so using them together can build a well-balanced foundation of strength.
About the Author
Tony Bonvechio is a strength and conditioning coach at Cressey Sports Performance in Hudson, MA, and a personal trainer in Providence, RI. A former college baseball player turned powerlifter, he earned his Master’s degree in Exercise Science from Adelphi University. You can read more from Tony at bonvecstrength.com.
*****

I just released two NEW Barbell & Kettlebell Integrated Online Training Programs. Both are now available for purchase as single sale programs.
Both single sale programs include interactive online support via my private online training Facebook group as well as limited email support.
Details about and links to purchase each program are below…
TSC Level I Program
The TSC Level I Program is an intermediate level, 6-days per week, 8-week program geared towards training to compete in the StrongFirst Tactical Strength Challenge in the Women’s Novice Division either 12kg or 16kg.
If you are training for the TSC in another division, you can still follow this program for the deadlift and snatch training.
The program is comprised of 3 training days for deadlift and 3 training days for flexed arm hang and snatches. The program alternates training days for deadlifts with training days for flexed arm hang and snatches.
This program will help you to,
- Build strength for the Flexed Arm Hang from 0 seconds;
- Increase 1 Rep Max for the barbell deadlift;
- Increase endurance and max reps of snatches in 5 min, either 12kg or 16kg kettlebell, your choice.
Core training, mobility warm-up & movement prep also included.
Purchase the TSC Level I single sale program HERE.
Barbell Deadlift 3x/wk, 8-week program
This is an intermediate to advanced level 3-days per week, 8-week program geared towards building strength with the barbell deadlift and increasing one’s 1 rep max for the barbell deadlift.
This barbell and kettlebell integrated program will help you to build strength for your deadlift while also maintaining skill and strength with fundamental kettlebell movements.
This program will help you to increase your 1 rep max for the barbell deadlift and trains the following movements:
- Barbell Deadlift
- Pull-ups
- Kettlebell Turkish get-up
- Kettlebell Military Press
- Kettlebell Squats and Lunge Variations
- Kettlebell Two Hand and One Hand Swings
Core training, mobility warm-up and movement prep also included.
Purchase the Barbell Deadlift 3x/wk, 8-week single sale program HERE.
315lbs Deadlift (2.75 times bodyweight)
All single sale programs include the following :
- Access to the program you purchased from the date of purchase until the end of time.
- 2 limited email check-ins over the course of the entire program length. For example, 1 email check-in after you purchase your program with any questions about the program and 1 additional email check-in half way through the program with any additional questions about the program and your training and progress thus far. Additional questions beyond the 2 designated emails over the course of the entire program length must be posted in the private Iron Body online training Facebook group. Note: these communications do not include communications initiated by me.
- Video review and feedback via the Iron Body online training Facebook group. Please post ALL videos in the Iron Body online training Facebook group unless otherwise requested by me.
If you seek additional coaching support beyond what is included with the single sale programs as listed above, you may purchase additional monthly support to accompany your single sale program.
Purchase your program today and let’s crush some weights!

You must be logged in to post a comment.