
The Ab Rollout
Please take a moment to Like IronBodyByArtemis on Facebook HERE.
Please take a moment to Follow @IrnBdyByArtemis on Twitter HERE.
The Ab Rollout is by far one of my most favorite abdominal exercises. Let’s face it, as Canadian Professor of Spine Biomechanics Stuart McGill confirms, crunches are OUT and there are much better, safer and more functional methods to train one’s core.
Some of the safest and most effective methods for training the core include maintaining a stiff, stable spine while managing an unstable load whether that load be your bodyweight, like with an Ab Rollout, or an actual weight like a kettlebell, when doing Around the World. Professor McGill talks more about this in this article, “The Man That Wants to Kill Crunches” by Patricia Treble. You will also find that if you brace your abdominals correctly while performing other strength training exercises including but not limited to the Dead-Lift, Front Squat, Goblet Squat, Pull-ups, or Kettlebell Swing that you will indeed train your abdominals while performing these total body movements.

Yes, I know that some of you are thinking “But wait??? How will I get my six pack abs???” Well, I have a News Flash for you, six pack abs don’t come from doing crunches or sit ups, they come from 1) genetics, 2) a proper, clean diet (specific to YOUR individual needs and food/body-type), and 3) a consistent strength and conditioning training regimen which includes both specific training for the core like Ab Rollouts, Around the World, Planks, Bird-Dog, etc. and total body strength movements such as the aforementioned Dead-Lift and Front Squat.
Back to the Ab Rollout… I first learned about the ab rollout when I was about 16 or 17 years old. My younger brother started studying martial arts when he was 6 years old, first Karate and then onto Tae Kwon Do when he was 14 years old. He is now a fourth degree black belt in Tae Kwon Do. As a result of his martial arts studies my entire family was introduced to the Ab Wheel (an evil apparatus with which to perform ab rollouts) when my brother started to study Tae Kwon Do. Thus of course, we had an Ab Wheel at my house when I was growing up. The Ab Wheel is a very popular training device amongst martial artists and it is very common to find rows of ab wheels at Martial Arts schools. In fact my former Kung Fu school in Fairfax, Virginia, The Chinese Martial Arts Institute used to (and actually still does) have a row of 12 Ab Wheels all lined up against the mirror at the front of the main training area (see pics below…)
Pictures courtesy of CMAI Black Belt, Instructor, San Da (San Shou) CMAI Fighting Team Coach, & butt-kicker extraordinaire :), Rupert Alfiler… (& p.s. as a side note, if you live in the DC/VA area and are looking for a great Martial Arts school, check out the Chinese Martial Arts Institute in Fairfax, VA. Sifu Clarence Burris is one of the best in the business.)


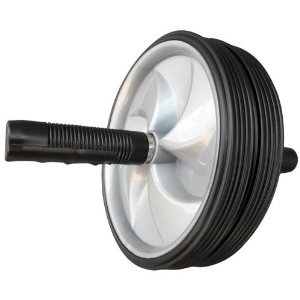
As a result of my early introduction to the Ab Wheel, I became very skilled at using this apparatus from a kneeling position at a young age. Ab Wheels cost about $10-$14, you can find them at any sporting goods store and they are lightweight and portable; therefore they are a great abdominal training tool to have at home and travel with.
Recently I began to incorporate ab rollouts with the Ab Wheel from standing into my training program. The standing ab rollout is an advanced abdominal exercise and I would only recommend it to those who have been training with the Ab Wheel from a kneeling position for sometime. Below is a list of some different progressions of the ab rollout by using different training tools:
The Ab Rollout using a Stability Ball – Kneeling
- Level: Beginner
- Starting Position: Kneeling
- Repetitions and Sets: Complete 5-10 repetitions per set, for 3-5 sets (adjust reps and sets as you become more skilled in this exercise.)
If you have never done an ab rollout before but would like to start doing them, I would recommend that you begin doing them with a stability ball. This is how I start out all of my clients if they have never done an ab rollout before.
- Kneeling before a stability ball with your spine completely upright and neutral (e.g. do not round your shoulders forward or hyperextend your lumbar spine), place the edge of your hands on top of the stability ball.
- Squeeze your legs together and brace your abdominals as you roll the edge of your hands over the ball. Allow your body to move forward naturally with the ball, your feet may stay on the ground (beginner) or leave the ground (more advanced).
- As you move your body forward with the rollout of the ball, it’s extremely important that your shoulders and hips stay as one unit and move together. You should not unpack your shoulders and let your upper body roll first and then let your hips follow. Move like your shoulders and your hips are one.
- Upon returning back to kneeling, continue to brace your abdominals, apply slight pressure to the ball with the edge of your hands, pull the ball back leading with the abdominal brace and follow with the help of your upper body. Return to starting position and then repeat.
Below is a video demonstration of this exercise:
The Ab Rollout using a TRX – Kneeling
- Level: Intermediate
- Starting Position: Kneeling
- Repetitions and Sets: Complete 5-10 repetitions per set, for 3-5 sets (adjust reps and sets as you become more skilled in this exercise.)
- Adjust the TRX straps to Long Length: Fully lengthen the TRX so that the bottom of the foot cradles are about three inches off the ground and/or the bottom of the foot cradles are at the height of your mid-calf if you are standing next to the TRX, (otherwise known as mid-calf length for the straps).
- Kneel behind the TRX facing away from the anchor point with your spine completely upright and neutral (e.g. do not round your shoulders forward or hyperextend your lumbar spine), and place your hands on the handles of the TRX. (Note: this exercise can also be performed while kneeling facing the anchor point.)
- Squeeze your legs together and brace your abdominals as you hold firmly onto the handles of the TRX and roll your body out away from the anchor point of the TRX. Allow your body to move forward naturally with the TRX, your feet may stay on the ground (less challenging) or leave the ground (more challenging).
- As you move your body forward with the rollout of the TRX, it’s extremely important that your shoulders and hips stay as one unit and move together. You should not unpack your shoulders and let your upper body roll first and then let your hips follow. Move like your shoulders and your hips are one.
- Upon returning back to kneeling, continue to brace your abdominals, apply slight pressure to the handles of the TRX, pull the TRX back leading with the abdominal brace, follow with the help of your upper body. Return to starting position and then repeat.
Below is a video demonstration of this exercise:
The Ab Rollout using a TRX – Standing
- Level: Intermediate
- Starting Position: Standing
- Repetitions and Sets: Complete 5-10 repetitions per set, for 3-5 sets (adjust reps and sets as you become more skilled in this exercise.)
- Adjust the TRX straps to Long Length: Fully lengthen the TRX so that the bottom of the foot cradles are about three inches off the ground and/or the bottom of the foot cradles at your mid-calf height if you are standing next to the TRX.
- Stand behind the TRX facing away from the anchor point, place your hands on the handles and walk out until the straps are at about a 45-degree angle and your wrists are below your shoulders and the TRX is NOT touching your arms.
- Feet may be completely on the ground or your heels may be off the ground. Feet may be placed hip distance (more challenging) or wider (less challenging). The wider they are placed, the larger your base, therefore the more stability you will have in that position.
- At this starting point your body should be in a push up plank-type position and it should be at a 45-degree angle like the TRX.
- Brace your abdominals as you hold firmly onto the handles of the TRX and roll your body out away from the anchor point of the TRX. Allow your body to move forward naturally with the TRX. Visualize extending your arms far out so that your body moves between your arms and your ears are between your biceps and let your heels naturally leave the ground with the forward rollout of your body.
- As you move your body forward with the rollout of the TRX, it’s extremely important that at the peak of your rollout that you do not stop bracing your abdominals and allow your lumbar spine to hyperextend. Also in this movement your shoulders and hips stay as one unit and move together. You should not unpack your shoulders and let your upper body roll first and then let your hips follow, falling into hyperextension. Move like your shoulders and your hips are one.
- Upon returning back to standing, continue to brace your abdominals, apply slight pressure to the handles of the TRX, pull the TRX back leading with the abdominal brace, follow with the help of your upper body. Return to starting position and then repeat.
Below is a video demonstration of this exercise:
The Ab Rollout using an Ab Wheel – Kneeling
- Level: Intermediate/Advanced
- Starting Position: Kneeling
- Repetitions and Sets: Complete 5-10 repetitions per set, for 3-5 sets (adjust reps and sets as you become more skilled in this exercise.)
- Kneel behind the Ab Wheel with your spine neutral (e.g. do not round your shoulders forward or hyperextend your lumbar spine), and place your hands on the handles of the Ab Wheel.
 Your toes may be touching the ground (less challenging) or off the ground (more challenging) to start. Her back is NOT correct/neutral –>>
 - Squeeze your legs together and brace your abdominals as you hold firmly onto the handles of the Ab Wheel. Roll your body out with the movement of the Ab Wheel. Allow your body to move forward naturally with the rollout, your feet may stay on the ground (less challenging) or leave the ground (more challenging).
- As you move your body forward with the rollout of the Ab Wheel, it’s extremely important that your shoulders and hips stay as one unit and move together. You should not unpack your shoulders and let your upper body roll first and then let your hips follow. Move like your shoulders and your hips are one.
- Upon returning back to kneeling, continue to brace your abdominals, apply slight pressure to the handles of the Ab Wheel, pull the Ab Wheel back leading with the abdominal brace, follow with the help of your upper body. Return to starting position and then repeat.
Below is a video demonstration of this exercise:
The Ab Rollout using an Ab Wheel – Standing
- Level: Advanced
- Starting Position: Standing
- Repetitions and Sets: Complete 5 repetitions per set, for 3-5 sets (adjust reps and sets as you become more skilled in this exercise.)
- Stand behind the Ab Wheel, hinge at the hips with a slight knee bend to reach the handles of the Ab Wheel while maintaining neutral spine, (e.g. do not round your shoulders forward or hyperextend your lumbar spine), and place your hands on the handles of the Ab Wheel.
- Feet should be placed hip distance.
- Brace your abdominals as you hold firmly onto the handles of the Ab Wheel. Roll your body out with the movement of the Ab Wheel until you are in a front plank position with your hands on the Ab Wheel. Allow your body to move forward naturally with the rollout.
- Upon returning back to standing, continue to brace your abdominals, apply slight pressure to the handles of the Ab Wheel, pull the Ab Wheel back leading with the abdominal brace, follow with the help of your upper body. Return to starting position and then repeat.
Below is a video demonstration of this exercise:
Please contact me with any questions and of course, ENJOY!

You must be logged in to post a comment.